告别 All in BOOM - iSCSI 块存储服务入门
前一周整了个 J1900,也算是从 ARM 转入 x86 的怀抱了。众所周知,这玩意由两个 SATA 接口,但是 CPU 性能比较差(也比 树莓派3 强多了),比较适合用来做存储和网关。
| 我才不会告诉你我测了半天发现跑个 docker 都费劲呢~
什么是 iSCSI
iSCSI,全称 Internet Small Computer System Interface(互联网小型计算机系统接口),是一种基于 TCP/IP 协议的存储网络标准。
它允许通过标准的 以太网(Ethernet)基础设施来传输传统的 SCSI(小型计算机系统接口)命令,从而实现 块级别(Block-level)的数据传输和访问。简单来说,iSCSI 就是在 IP 网络上运行 SCSI 协议,将远程的存储设备(如磁盘阵列)虚拟成本地的硬盘,供服务器或计算机使用。
在整个 iSCSI 架构中,发起方 (Initiator) 扮演着客户端的角色,它通常是需要存储空间的服务器或计算机,通过发送 SCSI 命令来请求数据。而 目标方 (Target) 则扮演着服务端的角色,它是一个存储设备,负责接收和处理来自发起方的 SCSI 命令,并将底层的存储资源(即 LUN,逻辑单元号)通过网络的方式虚拟成一块本地硬盘供发起方使用。
这次我们搞试验,就把 J1900 作为目标,而 Windows 电脑作为发起方。
Target
我们常使用 tgt 来搭建 target。我在这里跑 OpenWrt,用 opkg 一把梭就可以安装。
不幸的是,由于这个是比较偏门的应用场景,并没有一个 luci 供我们配置。不过我们仍然可以通过 uci 配置文件来统一化配置,对应的文件是 /etc/config/tgt,下面是一个实例:
config options 'tgt'
# iothreads limits number of worker threads per rdwr target, default is 16
# which seems to be too much for an avarage router
	option iothreads '2'
#	option nop_count '3'
#	option nop_interval '1'
#	option logging '0'
#	list portal '[::1]'
#	list portal '127.0.0.1:3261'
#	list portal '0.0.0.0:3262'
#	list portal '[::]:3263'

config target 1
    # 一个名字
	option name 'iqn.2012-06.lan.server:target1'
    # 允许连接的对端名称
	list allow_name 'iqn.1991-05.com.microsoft:xxx-laptop'
#	list allow_address '192.168.2.128/27'

#config target 2
#	option name 'iqn.2012-06.org.openwrt:t2'

# all options are set to default, except for the device
# lun "name" is constructed as TGTID_LUN
config lun 1_1
    # 这里可以指定一个设备名/文件名
	option device '/dev/sda'
# type of scsi device. available options: disk, cd, pt (sg passthrough)
#	option 'type' 'disk'
# backing store access method: rdwr (read-write), aio (async IO), sg (for pt type only, device must be /dev/sgN)
#	option 'bstype' 'aio'
# set sync and/or direct flags when opening device, affect only rdwr
#	option 'sync' '0'
#	option 'direct' '0'
# block size for lun, default is 512
#	option 'blocksize' 4096
# override SCSI mode page, see tgtadm man page for details
#	option 'mode_page' 'string'
# vendor, product, revision, SCSI ID and SCSI Serial number
#	option 'vendor_id' 'string'
#	option 'product_id' 'string'
#	option 'product_rev' 'string'
#	option 'scsi_id' 'string'
#	option 'scsi_sn' 'string'
# refuse write attempts. applies only to disk type
#	option 'readonly' '0'
# Disk devices default to non-removable, cd - to removable
#	option 'removable' '0'
#  0 = Classic sense format, 1 = Support descriptor format.
#	option 'sense_format' '0'
# Rotaion rate: 0: not reported, 1: non-rotational medium (SSD), 2-1024: reserverd, 1025+: "Nominal rotation rate"
#	option 'rotation_rate' '0'
# A thin-provisioned LUN is represented as a sparse file.
# When initiators use the SCSI UNMAP command TGTD will release the affected areas back to the filesystem using FALLOC_FL_PUNCH_HOLE.
# This option applies to the disk type and rdwr bstype
#	option 'thin_provisioning' '1'

# Target 1 上的第二个卷
config lun 1_2
	option device '/dev/sdb'

#config lun 2_2
#	option device /dev/sdc

# CHAP 认证账号相关
config account
	list target 1
#	list target 2
    # 建议设置为你的 Initiator 的名字,以确保只有一个连接
	option user "iqn.1991-05.com.microsoft:xxx-laptop"
    # 密码需要符合规范,我的试验是 12 位,带有大小写和数字就行
	option password "Abcdefgh1234"

#config account
#	option target 2
#	option user "user2"
#	option password "pwd2"
#	option outgoing 1
Initiator
Windows 一直都带有 iSCSI 发起程序,我们打开它。然后按图设置完成后,一路确定即可。
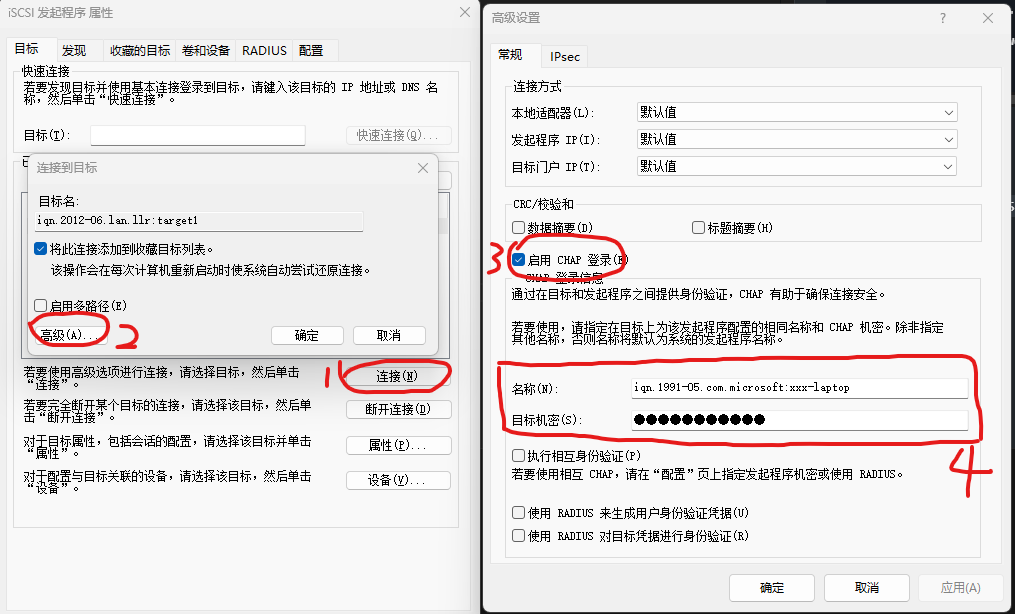
连接完成后,可以看到 已发现的目标 列表中多了一个项,且状态为 已连接。
如果使用的是一块现有的磁盘,那么应该可以在资源管理器里面直接看到原来的卷标了,否则请到磁盘管理里面去初始化磁盘再分区、格式化,就像插入了一块新硬盘一样。
EOF~